Subscribe

The best in health, wellness, and positive training from America’s leading dog experts

Home Blog Page 57

Dog Teeth Cleaning

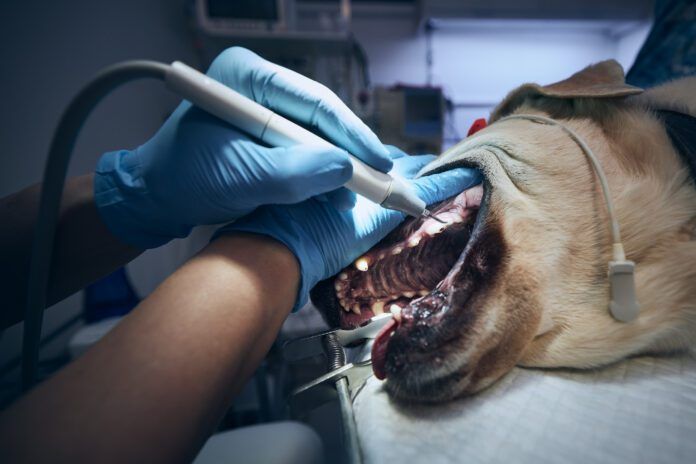
A dog teeth cleaning begins with a thorough exam and sedation.
During a professional dental cleaning at your veterinarian’s hospital, your dog will be under general anesthesia. This will be initially induced by an injected drug, but will be maintained by a gas anesthetic through an endotracheal tube in his airway (trachea). This also protects his respiratory system from the bacteria that will be aerosolized by the ultrasonic scaler during his dental cleaning. iPhoto by Chalabala, Getty Images.

Cleaning a dog’s teeth is far more complicated than the same procedure is for humans. There is much more involved in the process, from when you drop off your dog at the veterinary hospital to the time you pick him up at the end of the day.

Before the dog’s teeth cleaning begins

After your dog is checked in to the hospital, his dental team will begin preparing him for the dental procedure. A veterinary technician will place an intravenous (IV) catheter, and collect a blood sample for pre-anesthetic blood work, including a complete blood count (CBC) and chemistry panel. The CBC checks for anemia and any problems with his platelets or white blood cells. The chemistry panel gives his team a view of his overall organ function, including kidney values, liver enzymes, proteins, and electrolytes.

Your veterinarian will perform a complete physical examination of your dog. Your veterinarian will contact you if any abnormalities are found on his physical exam or blood work that may increase his risk for an adverse event under anesthesia. Your dog’s dental procedure may be rescheduled for another day after these abnormalities are either addressed or resolved.

A customized sedation and anesthetic plan will be created by his veterinarian. This plan takes into account your dog’s age, pre-existing health conditions, and any medications your dog may be taking. Your dog will receive medications first to sedate him and then to induce anesthesia.

Once your dog is anesthetized, the veterinary technician will place an endotracheal tube in his airway (trachea). The endotracheal tube delivers both oxygen and anesthetic gas directly to his lungs and keeps him asleep during his procedure. It also protects his respiratory system from the bacteria that will be aerosolized during his dental cleaning.

The next step is to connect your dog to the anesthetic monitoring equipment that will be keeping a constant vigil over his vital signs while he is anesthetized. His heart rate, respiratory rate, temperature, oxygen and carbon dioxide levels, blood pressure, and electrocardiogram (ECG) are displayed on an anesthetic monitor. This allows the veterinary team to intervene should changes to his vital parameters occur during his procedure.

When to see a board-certified veterinary dentist

Most primary care veterinarians are able to perform routine dental procedures and tooth extractions. But there are situations in which your veterinarian may refer you and your dog to a board-certified veterinary dentist. These situations include:

  • Extraction of lower canine teeth. Dogs have four canine teeth – the long “fangs” at the front of the mouth. Canine teeth have very long roots that sit at a 45- to 60-degree angle within the bone. The process of extracting diseased lower canine teeth can cause the lower jaw to fracture. Veterinary dentists have the tools and expertise to minimize the risk of a jaw fracture when extracting these teeth.
  • Root canal of otherwise healthy but fractured teeth. Veterinary dentists have the expertise to preserve the health of the fractured tooth as well as the teeth on either side of the affected tooth.
  • Excision of oral masses. Surgically removing an oral mass often means removing adjacent teeth and bone. Veterinary dentists are trained experts in these procedures.
  • Orthodontic therapy to correct malocclusions. Yes, there are doggie braces! If the position of one or more of your dog’s teeth is causing damage to other teeth or the roof of his mouth, a veterinary dentist can help get those wayward teeth into the correct position.
  • Oral trauma. Traumatic jaw or tooth fractures are best handled by a veterinary dentist.

Tools and techniques for a dog dental cleaning

The veterinary technician begins the dental cleaning by removing dental calculus from his teeth using an ultrasonic scaler – the same tool that your dental hygienist uses on your teeth. The technician will also use the ultrasonic scaler to remove tartar that has accumulated underneath the gum line.

Then dental radiographs are taken of all your dog’s teeth. Most adult dogs have 42 teeth: 20 on the upper jaw and 22 on the lower jaw. Depending on the size of your dog, as few as three teeth and as many as eight teeth can be imaged on a single x-ray. Smaller dogs will need six radiographs to image all of their teeth while larger dogs may require up to 14 radiographs.

X-ray of a dogs lower jaw.
As you can see from this radiograph of a dog’s lower front teeth, the roots of the lower canine teeth (the “fangs”) are very long. If one of these teeth are diseased and need to be extracted, it would be wise to have this performed by a board-certified veterinary dentist, as opposed to a primary-care veterinarian.

The veterinarian will then begin the process of examining the crown – the visible part – of each tooth. She will look for fractures, excessive wear, discoloration, and mobility of the teeth. Teeth that are fractured, gray or black, or that can be wiggled back and forth will likely need to be extracted.

The vet will use a dental probe to look for deep pockets between the teeth and the gingiva (gums). The presence of a deep pocket is indicative of underlying periodontal disease. She will also examine the radiographs of his teeth and take note of any damaged or diseased tooth roots or bone loss around the teeth. Teeth that have damaged or diseased roots or that have significant bone loss around them will likely need to be extracted.

Cost of dental cleaning

A routine dental cleaning, full oral examination, and dental radiographs with no extractions or other advanced care required will typically cost $500 to $1000. The exact cost will depend on your geographic location and the size of your dog. If your dog needs to have any teeth extracted, the cost of the dental procedure may be $1500 to $2500 with a primary care veterinarian. The cost of having a dental procedure performed by a board-certified veterinary dentist is typically higher because your dog is receiving specialized care.

Buyer beware: Not all veterinary hospitals perform pre-anesthetic bloodwork and dental radiographs. Depending on the veterinary practice law for the state in which you reside, a veterinary technician may be extracting diseased teeth, not a veterinarian. Always ask about the details of what the dental procedure includes and who performs each task. If the price of the dental cleaning is too good to be true, it probably is.

Most pet insurance policies include an option for covering annual dental prophylaxis and any additional dental work that may be required.

Note: While an “anesthesia-free dental cleaning” may seem like a bargain compared to the cost of a professional veterinary cleaning, this procedure is neither safe nor effective – and can, in fact, cause myriad problems. For details, click here.

Dog tooth extractions

Extracting a dog’s tooth is a multi-step process. The first step is to numb the region where the offending tooth is located by injecting a local anesthetic. Dogs can still feel pain even when they are under general anesthesia. Injecting a local anesthetic prior to extracting a tooth ensures that your dog will not feel pain during the procedure.

The next step is to create a gingival flap. A small incision is made in the gingiva on either side of the tooth. A flat, spoon-shaped tool called a periosteal elevator is used to lift the gingiva away from the tooth and the underlying bone. A high-speed dental drill is used to carefully burr away the bone that overlays the roots of the tooth. This process is called “making a window” over each root. Each tooth root is completely surrounded by bone. The only part of the bone that is removed is the part that covers the most superficial section of the root. This allows the veterinarian to visualize the root’s position within the bone and aids in extraction of the root.

Dogs have two types of teeth: single-rooted teeth and multi-rooted teeth. Multi-rooted teeth may have two or three roots. Prior to extraction, the crown of a multi-rooted tooth must be split into single-rooted sections. A high speed dental drill with a long cutting bit is used to carefully divide the crown along the position of each root.

Each tooth root is attached to the surrounding bone by a band of tissue called the periodontal ligament. This ligament needs to be carefully stretched and torn in order to release the root from the bone. A tool called a dental root elevator is used to stretch the periodontal ligament.

A dental root elevator has a long stem with a tapered half-moon shape at the end. The end is inserted into the space between the tooth root and the bone; this space is called the root socket. Then the elevator is gently rotated in one direction within the socket and held for 10 seconds. Pressure is released and then the elevator is rotated in the opposite direction and held for 10 seconds. This process is repeated until the root is mobile and can be elevated from the socket.

Elevating a single tooth root can take as little as 30 seconds for roots that are already loosened by severe periodontal disease. But if scar tissue has developed around the root or the root has become brittle, it can take up to 15 minutes to cleanly extract a single root. Brittle roots can break into multiple pieces, creating a situation where more of the surrounding bone has to be removed in order to retrieve each piece of root from the socket. This can be a long and frustrating process – and many swear jars have been filled to the brim during these types of dental procedures!

Once the tooth has been extracted, a dental radiograph is taken of the region to verify that all of the tooth roots have been completely removed. Any sharp edges of the surrounding bone are softened with a high speed dental drill using a rounding burr. The gingival flap is pulled over the top of the bone and sutured to the gingiva on the other side.

What happens after the dental cleaning

The final steps of the dental procedure include polishing your dog’s teeth and applying a dental barrier sealant. Polishing the teeth buffs out the microscopic scratches that the ultrasonic scaler can leave on the enamel. Plaque loves to grab on to those scratches and hang on, so polishing the teeth reduces the grippiness of future plaque deposits. Applying a barrier sealant prevents plaque-forming bacteria from attaching to the teeth for the first two weeks after a dental procedure.

After the dental procedure is finished, your dog will be woken up from anesthesia. His veterinary technician will remove his endotracheal tube and stay with him while he recovers from anesthesia. He will be ready to go home with you once he is able to stand and walk.

Your veterinarian will give you specific instructions about when to give your dog his first meal after his dental procedure and what to feed him over the next several days. You may observe some blood-tinged drool and facial swelling over the next 24 to 48 hours that will gradually subside. Your dog will go home with pain medications to take over the next several days. If he had a tooth root abscess, your dog may also be sent home with an antibiotic.

You will also be given instructions on how to maintain your dog’s clean and healthy teeth. This at-home dental care plan will likely include daily tooth brushing or dental chews (see “At-Home Dental Care for Dogs”). An annual dental prophylaxis (routine cleaning and examination under general anesthesia) will also be recommended.

At-home Dental Care for Dogs

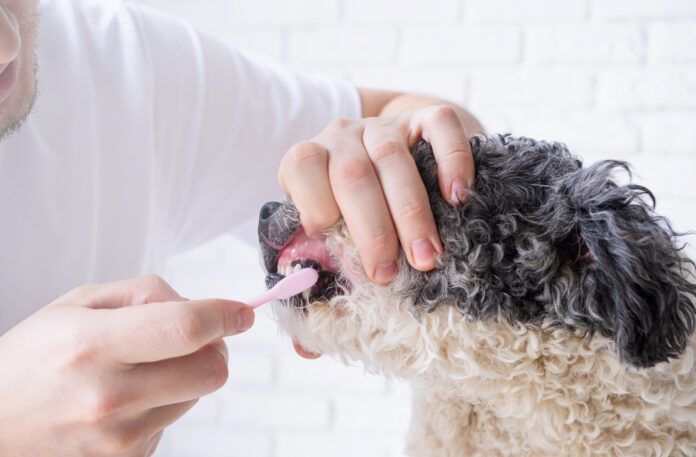
Pet care. Owner brushing teeth of cute mixed breed dog at home
When you start brushing your dog’s teeth, use the softest brush you can find; otherwise, your dog’s gums may bleed for the first couple of weeks of brushing. Use a wet brush and very small amounts of dog toothpaste; you don’t need or want a lot of foam in your dog’s mouth. Photo by Ilona Shorokhova, Getty Images

Most dog owners are disappointed to hear that brushing their dogs’ teeth is a necessary part of maintaining the health of their dogs. Regular oral examinations and professional cleaning by a veterinarian is also needed, but this professional service is an adjunct to, not a replacement for, regular tooth brushing.

We brush our teeth at least twice a day. You may have noticed that the surface of your teeth will start to feel fuzzy when you get close to the next time you are due to brush your teeth. When you eat and drink, bacteria in your mouth begin to accumulate on the surface of your teeth. This creates a biofilm, which feels fuzzy when you run your tongue over it.

As the biofilm accumulates layer upon layer, plaque is formed – both on the surface of your teeth and below the gumline. Over time, plaque that is not removed by brushing and flossing becomes hardened and mineralized, forming dental calculus.

This same process occurs in your dog’s mouth. It does not matter if your dog eats canned food, dry kibble, frozen fresh food, or a home-cooked diet. Any food in the mouth promotes the production of biofilm, plaque, and dental calculus. The exception to this are kibble diets that have been specifically formulated to remove plaque and tartar accumulation, such as the Hills t/d prescription diet.

Brushing your dog’s teeth twice a day promotes good oral health and minimizes the risk of developing periodontal disease. However, even brushing just three times a week has been shown to provide a benefit.

How to brush your dog’s teeth

The key to introducing a dog to tooth brushing is to take it slow. Start with just rubbing your finger or a soft damp washcloth on the outer surface of your dog’s front teeth. Rub with a back and forth motion and concentrate on where the teeth meet the gums.

Once your dog is accustomed to this routine, start advancing toward the back teeth. The teeth on your dog’s upper jaw overhang the teeth on his lower jaw, so you may need to open his mouth slightly to rub the lower teeth.

If your dog will let you open his mouth to access the middle and inner surfaces of his teeth, add this into the tooth-rubbing routine. Many dogs are resistant to this, so if this is a game-changer for him, then don’t push it. You want the tooth-brushing experience to be a good one, not one that he dislikes.

Now you can move on to the next step. Introduce a soft toothbrush or a finger brush to the routine. Again, start with the front teeth and gradually move to the back teeth. You can use a toothbrush that is made for dogs, a rubber brush that fits over the end of your finger, or a soft toothbrush made for human babies. If your dog objects to the toothbrush but is still comfortable with a damp washcloth, you can use the washcloth as your brush.

The final step is to introduce dog toothpaste. Dog toothpaste comes in many flavors, such as chicken, beef, peanut butter, and mint. Put a little dab of toothpaste on your finger and allow your dog to investigate the smell and flavor. If he reels away from it, try a different flavor!

Do not use human toothpaste; it is not meant to be swallowed. We are not able to instruct our dogs to “rinse and spit,” so we need to use a toothpaste that is safe for his gastrointestinal tract.

For even more toothbrushing tips, click here.

How to select a dog toothpaste and toothbrush

Don’t be intimidated by the number and variety of dog toothpastes on the market, and read more about these products here. Look for the VOHC logo. Photo by Nancy Kerns

When selecting a dental health product, look for the seal of approval from the Veterinary Oral Health Council (VOHC).

Look at the toothpaste you use for yourself and look at the label. You will probably notice a small emblem on the label that states “ADA Seal of Acceptance.” This means that the toothpaste has met the standards set forth by the American Dental Association to benefit your oral health.

Your canine companions have a similar organization looking out for their oral health. The VOHC was formed in 1997 and has the support of the Academy of Veterinary Dentistry and the American Veterinary Dental College.

The VOHC does not test dental products. Instead, they accept applications from manufacturers of dental products to receive the seal of approval. The VOHC completes a rigorous review of the scientific studies backing the manufacturer’s claims. If the product meets the stringent standards set forth by the VOHC, then the product is accepted and is added to the VOHC list of approved products.

This is a voluntary program. A product that does not carry the VOHC seal of approval does not mean that the product does not work. But a product that has the VOHC seal of approval gives you peace of mind that the product has met a set of stringent standards, is safe, and is proven to work as intended.

Look for the “VOHC Accepted” logo when selecting a dental product for your dog. A list of approved products can be found here.

Alternatives to tooth-brushing

If your dog really objects to having his teeth brushed, there is no need for despair. There are several treats, chews, and additives that you can put in your dog’s food or water to help minimize the production of plaque in your dog’s mouth. Twice daily tooth brushing remains the gold standard for at-home dental care, but using one of these alternatives will provide some benefit to your dog.

There are many treats, chews, and food/water additives that claim to be beneficial for your dog’s oral health.

Brushing your dog’s teeth is not enough!

It is important to note that starting an at-home dental care plan after periodontal disease has been diagnosed will not reverse that disease or stop its progression. If your veterinarian suspects that your dog has periodontal disease, the first step in addressing that problem is a professional dental cleaning and oral exam. Then you can successfully start an at-home dental care program once your dog’s mouth is a clean and healthy slate.

Anesthesia-Free Teeth Cleaning for Dogs

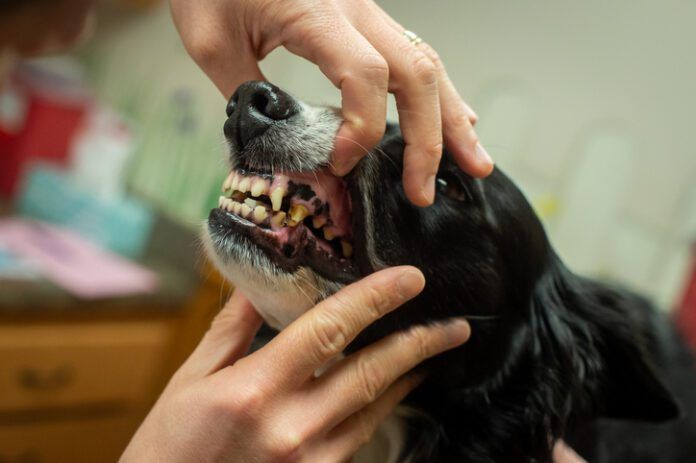
A Border Collie gets its teeth examined at the veterinarian. The dog's teeth are not in good condition.
We don’t recommend anesthesia-free teeth cleaning for dogs. While a skilled technician maybe able to scrape away some of the tartar that has developed on the surfaces of the teeth that you can see, it’s impossible to address the surfaces under the gums where periodontal disease develops. And it hurts! Photo by Hillary Kladke, Getty Images.

Anesthesia-free teeth cleaning for dogs is offered by anesthesia-free dental clinics and by many groomers. This may sound like an attractive option, as many people are anxious about having their dogs undergo general anesthesia. But the reality is that cleaning the teeth without the benefit of general anesthesia will do more harm than good.

During this procedure, the operator uses a tool called a hand scaler to remove dental calculus from your dog’s teeth. A hand scaler is a long, thin metal tool with a hook on the end. The hook has a sharp edge on the inside of the curve and ends in a sharp point. If your dog moves his head even slightly during the procedure, the operator can lose control of this sharp instrument and cause serious damage to your dog’s gums.

Hand scalers are not effective at removing dental calculus from underneath your dog’s gums or between the teeth. Dogs may not allow the operator to reach the teeth at the back of his mouth, meaning that only the front teeth can be scaled. Most dogs will not allow an operator to scale the inside surfaces of their teeth.

Anesthesia-free teeth cleaning does not allow for a full oral examination of all tooth surfaces and the gums. And the majority of early to mid-stage periodontal disease is hidden below the gumline. Only dental radiographs can give us the full picture of what we cannot see on the surface.

Anesthesia-free teeth cleaning can be painful and traumatic for your dog. It may even make him averse to any dental care plan (like tooth brushing) you try to implement at home.

Dog Elbow Hygromas

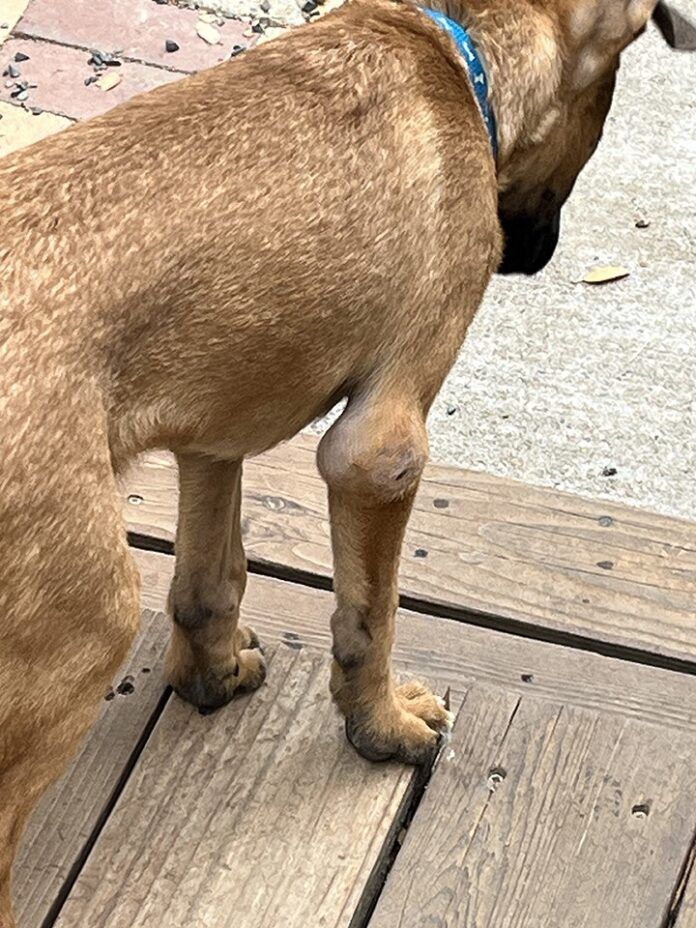
A small brown dog with a large swelling on his elbow.
While hygromas are most common in large dogs, small dogs can develop them, especially in places with only hard surfaces such as shelters. Photo by Nancy Kerns

A hygroma is a large, fluid-filled lump on a dog’s elbow – or, actually, a fluid-filled lump on any bony point on your dog that frequently comes into contact with the ground when he sits or lays down. Elbow hygromas are the most common, especially in large breed dogs, but some dogs in shelters or other places with hard floors develop hygromas on their hocks. It’s much less common, but very thin dogs may develop hygromas on the bony points on their butts (ischiatic tuberosity) from sitting on hard surfaces.

These fluid-filled sacs develop as a result of repeated trauma or pressure over a bony prominence. Think about the Great Dane or St. Bernard who clunks himself down for a rest on hard surfaces like tile or hardwood floors. This repeated irritation to the elbow causes tissue damage and inflammation, resulting in fluid accumulation.

Uncomplicated elbow hygromas in dogs

Usually, these fluid-filled lumps are what veterinarians call uncomplicated hygromas – meaning they are not painful or infected. Often, we can get hygromas to resolve by protecting the elbows by providing cushioned bedding in any area where he frequently rests – and by limiting his access to areas where he prefers to lay on hard surfaces.

Some owners use protective neoprene sleeves that pad their dogs’ elbows – Dogleggs was one of the first companies that made a product for this purpose, though you can find many others today (search for “dog elbow pads”).

Complicated hygromas in dogs

Closeup of a dog's hocks with two hygromas.
This dog developed hygromas on his hocks while staying in a shelter. He also had an underlying condition called Ehler-Danlos syndrome, an inherited disorder of the connective tissue, which contributed to his tendency to develop hygromas. Photo by Nancy Kerns

Because hygromas don’t seem to cause the dog any pain, some owners choose to ignore the swelling. This is a big mistake. Left unaddressed, an uncomplicated hygroma can become a painful, disastrous, complicated hygroma in a hot minute.

Draining an uncomplicated hygroma can remove the fluid accumulation – but this is not recommended because of the risk of introducing infection. Additionally, draining the hygroma does not address the underlying cause, which is repeated trauma and pressure on the elbows. Most drained hygromas will fill again within a day.

Drained or not, some hygromas become infected, at which point they become very painful and won’t heal without veterinary attention. Sometimes the skin surface becomes ulcerated, and sometimes the whole thing breaks wide open. In these cases, treatment with antibiotics alone is usually not enough. The lesion needs to be surgically drained and flushed. To keep it draining while the infection resolves, your veterinarian will place a soft, open rubber tube called a Penrose drain. This stays in place for several days until the drainage slows or stops. Daily bandage changes are required to protect the site and prevent new infection from ascending up the open drain.

Further, unfortunately, this first line approach doesn’t always work. The final option for complicated hygromas that don’t resolve with surgical drainage is surgical removal of the hygroma. This, however, should not be undertaken lightly. Most surgeons reserve this option for severely infected, painful, non-responding hygromas, or if there is suspicion of cancer. Hygroma removal can have severe complications, especially when it comes to healing.

his makes sense when you think about it. The hygroma developed as a result of repeated trauma and pressure on the elbow. It is difficult to protect the elbow from these challenges. Now, add in a surgical incision with sutures whose job it is to keep the skin edges together. In addition to the trauma from lying down, there is so much movement at the elbow joint, it’s almost impossible to immobilize that area to aid healing. Because of these challenges, sutures can fail and incisions can break open.  Sometimes special techniques like skin flaps or grafts are necessary to close the surgical wound. Your best bet is referral to a highly skilled, board-certified veterinary surgeon for this procedure.

Take immediate steps to prevent hygromas from getting worse

While a hygroma may not initially be a problem for your dog, it’s not something you should ignore. If you find a soft swelling on your dog’s elbow or other bony prominence, schedule a veterinary exam right away. This is the best way to ensure the swelling is indeed a hygroma, not something worse, and to get advice and guidance on how to treat this one, and prevent the next one. And immediately provide your dog with super-cushioned resting places and prevent his access to hard resting surfaces.

How Often Should You Walk Your Dog?

A fit older man walks a small dog white dog down neighborhood streets.

There isn’t a valid one-size-fits-all recommendation for the distance or amount of time that you should walk your dog. There are many relevant factors, specific to each individual’s health and needs, that should determine how often you should walk your dog, including:

  • Age: Young puppies and senior dogs generally don’t need as much exercise as adolescent and middle-aged dogs; in fact, you can easily cause them physical harm if you try to do too much, either walking them too far or too many times in a day.
  • Fitness: A lean, fit dog can go for several long, energetic walks a day. An overweight, out-of-shape dog needs to take it very easy, with slow strolls – and not too far.
  • Elimination Habits. Some dogs poop just once a day; some poop three times on every walk. And some dogs won’t (or can’t seem to) poop until they’ve walked for a mile or more. When you’ve determined what works best for your dog, it will keep his physical discomfort at a minimum if you maintain a consistent schedule for his opportunities to eliminate.
  • Health Walking should always be reduced in duration and frequency for short-term conditions like a scraped or lacerated paw pad, heartworm treatment, or temporary recovery from surgery. Longer-term health challenges such as chronic breathing problems or painful conditions like arthritis call for slower, shorter walks.
  • Breed or Type: In general, dogs bred for high activity – sporting, herding, and working breeds, for example – can (and should) get a lot longer walks than the short-legged brachycephalic breeds like the English Bulldog, French Bulldog, and similar short-nosed dogs, or giant breeds like the St. Bernard or Mastiff.
  • Environment: Your dog can suffer from extreme heat or cold, and your walks should be shortened considerably at these times. Again, it can be breed-specific to some degree; your Siberian Husky, bred to pull sleds in cold and snow, can stay out a lot longer in sub-freezing weather than your Chihuahua can, while your Pomeranian (whose ancestors were also originally bred to pull sleds!) is likely to suffer heat stress a lot sooner than the Greyhound, bred centuries ago to chase wildlife in the Egyptian desert.
  • Desire: While we tend to assume that every dog loves to hike for miles, we are increasingly paying attention to our dogs telling us what they want to do! Dogs need mental and physical exercise and enrichment to thrive – but this doesn’t always have to be delivered by a walk! A “sniffari” (a slow exploration of a field or park on a long leash, completely at the dog’s pace, allowing him to sniff everything for as long as he’d like) can be as tiring – and more enjoyable for the dog – as a five-mile walk. In contrast, chasing a ball or flying disc in the backyard can be more fun and more tiring than a boring human-pace walk. Think about what your dog likes to do best, and, at times, deliver up exactly what she’d most enjoy.

A couple caveats: If your dog is an exercise addict, always wanting to go farther and faster, longer and faster walks may not be in her best interest – and may lead to her over-eager anticipation of a half-marathon or footrace every time you attach her leash. To develop a more balanced approach to her walks, alternate the long walks with shorter ones, encouraging her to sniff and look around.

If, in contrast, your dog sometimes balks on your walks, laying down or pulling for home, you are likely overdoing it – and she maybe experiencing some physical discomfort you can’t appreciate; a consultation with your veterinarian is in order. There is no valid reason to force your dog into an activity she doesn’t enjoy.

There may be medical considerations that go beyond the ones we mentioned above. Your dog’s vet is the expert when it comes to physical concerns about too much – or not enough – exercise for your dog.

Utilize Target Training for Better Leash Walking

0
How to Walk Your Dog eBook from Whole Dog Journal
Eventually, your dog will walk on a loose leash, with his attention mainly focused on you. Credit: fotografixx / Getty Images
Excerpted from How to Walk Your Dog by Pat Miller, CPDT and Mardi Richmond, MA, CPDT-KA

Does your dog know how to target? If not, the two of you may be missing out on one of the most versatile behaviors to come along since the rise in popularity of the positive dog training philosophy.

Targeting simply means teaching your dog to touch a designated body part to a designated spot the end of a commercially produced target stick, your hand, an object, a location, or anything at all. While much targeting is done with the dog’s nose as the designated body part, you can actually teach your dog to touch with a front or hind foot, his hip, shoulder, ear, or any other moveable piece of his anatomy.

We teach nose targeting in my Basic Adult and Puppy classes. Whenever I introduce the exercise to a new group I get puzzled stares from most of the humans in the class. I can just see them thinking, “Why on earth would I want to teach my dog to do that?!” proof that the concept of targeting still has miles to go before gaining familiarity and acceptance in the mainstream pet dog community.

The list of reasons why you want to teach your dog to touch is as long as your arm, and then some. From the serious to the sublime, targeting is useful and fun for canines and humans alike. You can use targeting to teach good manners and dog behaviors such as “Go to your place” and to help your dog learn polite leash walking. “Touch
the target” can be used as an emergency recall, or your dog’s cue to ask to go outside.

It also has widespread application for a number of service dog behaviors, can be used to teach agility dogs to hit the contact zones, and give search dogs a tool to communicate that they’ve located sign of the missing person (or pet). Finally, targeting can come into play with an endless variety of entertaining tricks and games. There’s something for everyone.

Before you begin target training your dog, download the How to Walk Your Dog eBook today!

Dog Training Basics: How to Teach a Cue

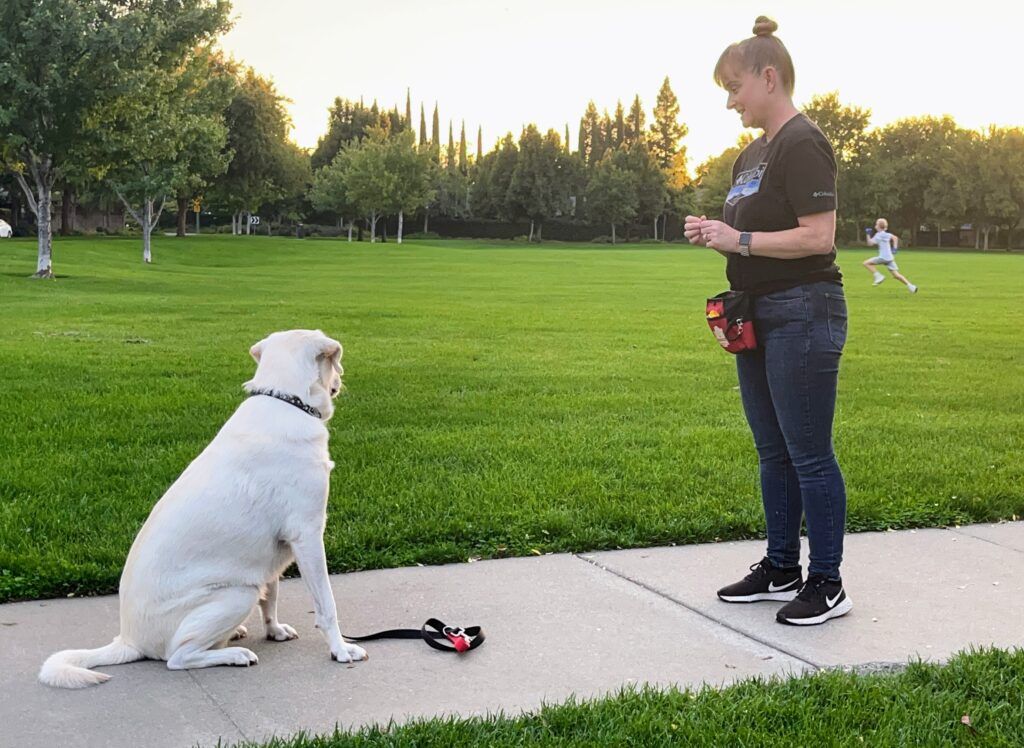
A white dog on a leash looks intently at its owner for hand commands.
Using a food lure is an easy and effective way to first get a new behavior from our dogs. “Fade” (stop using) the lure and use an empty hand for the cue, feeding treats from the other hand, as soon as you can.

While our dogs are born with all sorts of natural canine inclinations – like searching out food, investigating scents, romping with friends – “listen to words from humans” is not part of their default program. That’s one they have to learn, from us. With the right kind of teaching, responding to your cues will become a dog’s go-to choice because it is the most reliable route to the things he wants.

Commands vs. Cues

Sometimes folks contact me saying their dog seems to be difficult to train. Then I show up and find that – with the best of intentions – they’re “commanding” their confused dog to DOWN! and LEAVE IT! in a big, scary voice. Rather than learning, the dog is intimidated and shuts down.

While old-fashioned dog training was driven by that kind of voice and a forceful “do it or else” approach, today we know that a more positive teaching style works better in the long run. To reflect that shift, WDJ along with much of the industry now uses the term “cue” rather than “command.” A cue is a signal to your dog that she has an opportunity to earn something she wants with the right response.

Teach Cues in This Order


Generally, the easiest way to begin teaching behaviors is by using a food lure. Here’s what that looks like. (Note that this stuff seems awfully complicated when it’s written out, but it’s really not.)

  1. START WITH NO CUE. Folks always want to start by saying the cue word, but if you keep repeating a word that’s currently meaningless to your dog, she might end up associating it with the wrong thing. (“Oh, I guess ‘sit’ must mean that kitty cat who just walked by.”)
  2. USE A LURE. Lure your dog’s body into position with a nugget of food that you keep just in front of his nose. Move s-l-o-w-l-y so the dog’s body can easily follow. (The most common mistakes are keeping food too far from the nose and/or moving it too quickly.) The moment the dog’s body is in the right spot, create a marker sound (more on that next) and pop the treat into your dog’s mouth.
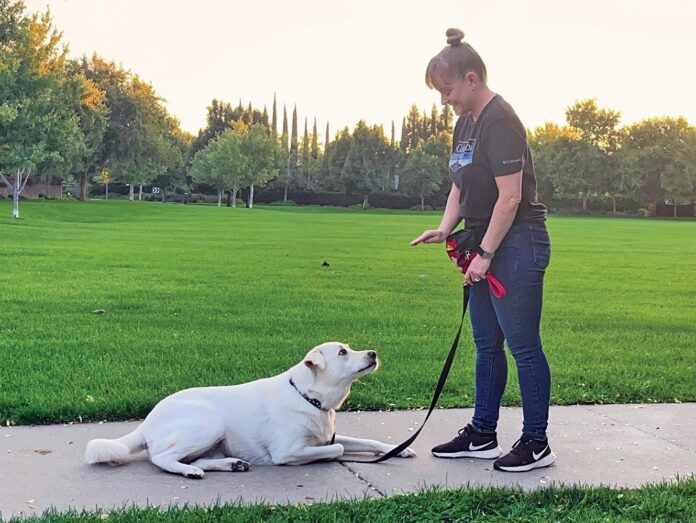
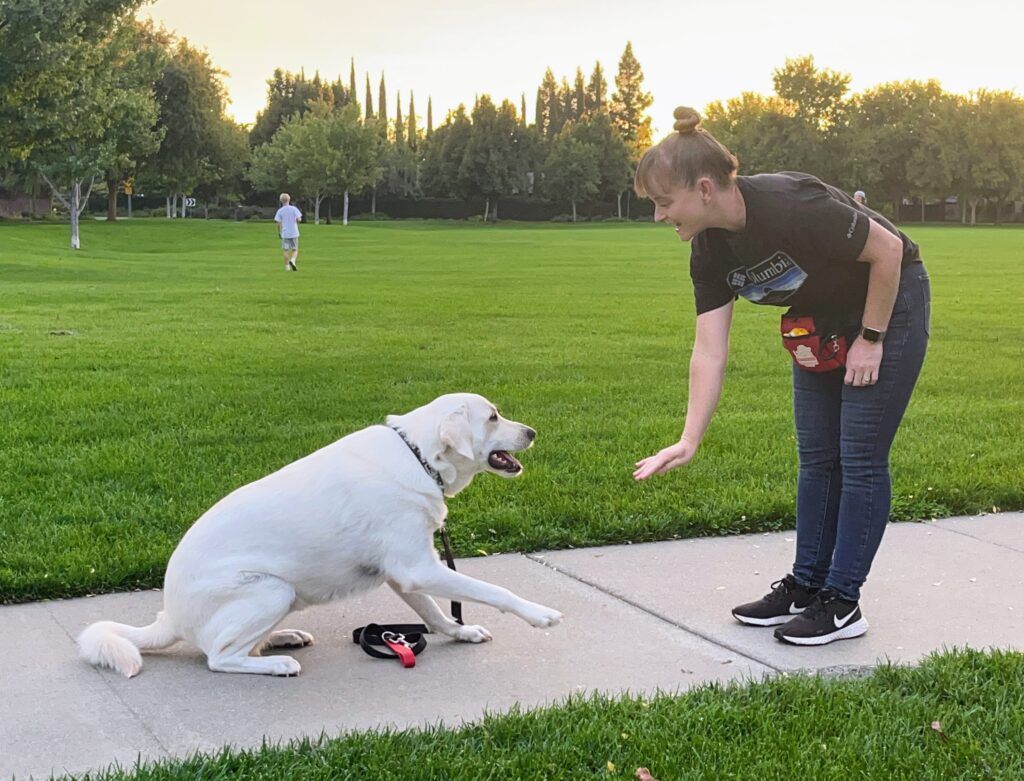
    A woman teaches her dog the final step of the cue process without a lure.
    When she clearly understands this large hand signal, start reducing its size. Initially, our dog model, Luna, confused the smaller signal for down with a somewhat similar cue for “paw.”
  3. ADD THE VERBAL CUE. Once you can reliably lure the behavior, you can start saying the cue word as you do that. Now, the dog links that correct body position with the appropriate cue word.
  4. CHANGE THE LURE TO A HAND SIGNAL. Once this is all going swimmingly – your pup is offering that behavior about four out of five times – give the verbal cue as you mimic the luring motion with an empty directing hand. Ideally pup performs exactly as he has been, and you deliver that reward just as quickly, except from the other hand. The dog learns that following an empty hand works just as well. Now you’re using a hand signal.
    A woman uses a lure to bring her dog flat to the ground as part of teaching the dog a cue.
    When she’s following the treat to the floor nearly every time, try moving your empty hand to the floor. Feed her a treat from your other hand the moment she is in a “down.”
  5. MAKE THE HAND SIGNAL SMALLER. As the dog catches on, the hand signal that began as a replica of the luring motion becomes smaller and smaller. For example, where you previously used a dramatic finger moving all the way to the ground to signify a down, you can now just do a quick point.
    A woman teaches her dog the final step of the cue process without a lure.
    When she clearly understands this large hand signal, start reducing its size. Initially, our dog model, Luna, confused the smaller signal for down with a somewhat similar cue for “paw.”
  6. DROP THE HAND SIGNAL. Sometimes people tell me in a very impressed tone that their brother-in-law’s dog follows hand signals without him saying anything! I don’t want to break the spell, so I keep it to myself that yeah, that’s easier. Dogs naturally pay attention to body language; it’s much harder to teach them to respond to our verbal language.

To do that, once we have a very minimized hand signal, we use timing to remove it entirely. We say the cue, and rather than immediately giving the hand signal, we wait a second to see if pup processes what we’ve just asked. No? Then give that signal.

Try again, with that little delay between the verbal cue and the hand signal. One of these times, your pup is going to do the thing you asked with no extra help from your body language. (Now go brag to your brother-in-law!)

Choose Just a Few Cues to Teach Your Dog at First

Remember that what you’re really teaching at first is the whole concept of training. Once your dog gets the idea that this is a fun new game where you’ll be guiding her into doing things – and she gets prizes when she gets it right – she’ll be all in.

Here’s my first-week list of (usually) easy-to-learn things:

  • Name = Dog makes eye contact with human
  • Sit = Dog’s bum touches floor
  • Touch = Dog’s nose touches hand
  • Find It = Dog searches floor for kibble
  • Come! = Dog zooms to human for amazing treat

I encourage folks to spend a week getting those behaviors nice and solid, but it turns out that’s a big ask because humans are always in a rush. We all want to show off a 20-foot “stay” and a “leave it” in front of a mouth-watering bone!

Try to resist hurrying. Let’s show our dogs that it’s easy for things to work out well for them here on Planet Human. Let your dog feel like a superstar at the first five cues before you move onto the next tier of challenges.


Name = Dog makes eye contact with human Sit = Dog’s bum touches floor Touch = Dog’s nose touches hand Find It = Dog searches floor for kibble Come! = Dog zooms to human for amazing treat I encourage folks to spend a week getting those behaviors nice and solid, but it turns out that’s a big ask because humans are always in a rush. We all want to show off a 20-foot “stay” and a “leave it” in front of a mouth-watering bone! Try to resist hurrying. Let’s show our dogs that it’s easy for things to work out well for them here on Planet Human. Let your dog feel like a superstar at the first five cues before you move onto the next tier of challenges.

The Marker: Click Or “Yesss!”

If you’ve ever tried to learn something that feels very foreign to you – and you really had no idea if you were getting it or not – you’ll appreciate the beauty of what’s become known as “clicker training.” This is where you use a clear, concise sound to mark the exact moment your dog got it right.

The concept came from marine mammal training, where behaviorists used whistles to tell mid-air dolphins, “YES! That higher jump is exactly what we were looking for, and as soon as you swim to the side you’ll get a fish.” That whistle turned into a clicker for the dog world, and decades later, the Clicker Expo is the largest dog-training gathering in the world. Why? Because using a marker speeds learning.

Mind you, most of my beginning clients don’t love using the clicker, and I get it. We need a hand for the leash, a hand for the hand signal, a hand for dispensing treats, and now a hand for the clicker? It’s a challenge, and I don’t want that physical awkwardness to get in the way of a love of training, so I start with a different but almost as effective marker: the word “Yesss!” delivered in such a way that it is very distinct, clipped, and unmistakable.

Your mission is to learn to deliver that marker with perfect timing. Do it the very second your dog’s bum hits the floor in a “sit,” or nose bumps your hand in a “touch.” A treat always follows the marker. Soon enough, your pup is loving the sound of that marker, because it’s become a predictor of the reinforcer (the treat). At that point, the “Yesss!” has become what’s called a “conditioned reinforcer” and now carries power of its own. Now you can make your dog feel amazing the second he gets something right and hears that sound.

In contrast, if you didn’t mark that moment, you might be fumbling in your treat bag for a reward and by the time you deliver it (the moment the dog will remember) he’s no longer in that great sit.

It’s worth working on the timing of this; you’ll need to practice. I have a trainer friend who has his clients practice clicking (or saying “Yesss!”) the moment he bounces a tennis ball. You know what that teaches them? This is indeed something that needs practice! So practice your marker, and once you are great at giving instantaneous feedback, watch your dog suddenly seem like a genius.

For me, the marker technique is critical when I’m teaching something new, and I will drop the click or the “Yesss!” once the behavior is fluent. The point of the marker is to clarify exactly what’s being asked, and that kind of precision is no longer needed once the dog knows.

Moving to Intermittent Reinforcement

One of the big misconceptions about rewards-based positive reinforcement training is that you can’t ask your dog to do anything unless you have a cookie in your hand. That would be a legitimate gripe, if it were true!

But it’s not.

Once a pup is reliably succeeding at a certain cue, it’s important to move to something called “intermittent reinforcement,” which essentially means there’s no longer a treat every time . . . but there’s one often enough to keep your dog playing the lottery.

This is a critical step in training that first-timers sometimes miss. Folks get stuck in the mindset of Class #1 in Puppy 101, where in fact we give treats out with abandon, for every little look, touch, sit, and spin! In that earliest of phases we are seeking to build the strong “aha” moment where the pup deeply internalizes the idea that listening for a cue and responding with a behavior is the surest way to get stuff that makes them happy.

Once that light bulb has gone on, however, it’s time to move to the next big idea, which is essentially the lottery concept: You gotta play to win! We want to build into our pups the understanding that just because they didn’t get rewarded for one particular “down” it doesn’t mean the whole system is no longer in operation. It just means you have to keep trying and one of these times there’ll be a reward. Slowing the faucet builds resilience and turns your pup into one who will keep trying. He experiences an initial no-cookie moment, and comes out the other side to find . . . an eventual cookie!

I find the easiest way into this transition is to start asking for two-fers and three-fers. A puppy in her first training class gets a click and a treat for a sit, and right after that, a click and a treat for a touch. A week later, when the pup is now reliably performing both of those cues in class, we move into a two-fer: We ask for a sit and immediately after that ask for a touch. Pup gets a click and a treat after the second behavior. Or after the third behavior in a touch-spin-sit three-fer.

“Ack!” you’re thinking! “No click after that first behavior? But will my pup think she’s suddenly doing it wrong?” I promise if you group those cues together closely enough your pup won’t have time to be disturbed about that. However, this is where a new sound, an informative marker, could come in handy. You can use a quick “good,” or “mm-hmm” to confirm your pup did something right. It doesn’t promise a treat, but it gives affirmation.

Moving to intermittent reinforcement has the counterintuitive effect of making dogs more focused rather than less. When the faucet turns off a bit the learner will try a little harder to make it turn back on: more intense eye contact, a straighter sit, a quicker down. Essentially: “Huh. No treat? Let me try that again.”

At various points in your life with your dog, you’ll be at different reward schedules for different cues. Very quickly, you’ll be able to move to an intermittent schedule for a handful of the cues that are easiest for your pup. But it’s typical that you might be struggling with, say, “down” – so pup gets a click and a treat every single time those elbows hit the ground. Why? Because clear, consistent reinforcement of a behavior builds that behavior. Once it’s easy for your pup, there’s no longer a need to provide that bright neon sign.

When Can You Stop Giving Treats?

To Adjust Difficulty, Use The Three D’s: Distance, Duration, and Distraction

There are three factors that can either increase or decrease the difficulty of the behavior you are teaching your dog. Trainers often call them the three D’s: Distance, Duration, and Distraction.

If your dog seems to be having trouble learning something, ponder whether you can make one of the three D’s easier. Did you throw the treat too far away when you tried “Find It”? (Reduce the distance!) When you asked for a stay, did you wait so long to reward that your dog gave up? (Reduce the duration!) Were you surprised that your dog didn’t offer her usually easy sit when the neighbors were over? (Reduce the distractions!)

If you scale back your D’s, you’ll likely get to a place where your pup can more easily succeed. Start there, and build the skill.

On the other hand, if you are getting a little bored and think you have nothing left to teach, think about increasing one or more of the three D’s. There’s always a way to make a cue/behavior more challenging:

  • Try giving your dog a cue to sit when he’s on the far side of the room, or 50 feet ahead of you on a trail (increasing the distance).
  • Ask your dog to hold his down/stay for the length of your weekly call with a relative or while you answer an email or two (increasing duration).
  • Try giving your dog a cue while you’re lying down or doing jumping jacks (increasing distractions).

It’s nice to have a dog who always sits when you give her the cue while standing in front of her in the kitchen where you always train. But it’s far more helpful for your life (not to mention more interesting and fun) if you “proof” that behavior by gradually varying the 3 D’s. Imagine how cool it would be if your pup would easily listen in the middle of a crowded barbeque as you yelled “Stay!” from across the yard when a guest mistakenly left a gate wide open.

Using rewards-based, relationship-building methods isn’t brain surgery, but it’s also not as easy as you might think. Investing a little time in refining your technique will save you (and your dog) lots of frustration.

Inevitably, this question arises: “So when can we stop with the treats altogether?” It is, in a certain sense, a logical question. After all, if we’re scaling back to intermittent reinforcement, it seems we’re heading in the direction of zero.

Ah, but we are not.

We often ask dogs to do things – for our own convenience – that:

  • They would not do on their own.
  • Are not intrinsically rewarding to them.
  • Are often, in fact, against their natural instincts and desires.

The science of learning theory says that none of us does anything for very long unless it is somehow reinforcing/rewarding/in our own best interest. Despite Lassie and the mountains of dog myths in the back of our collective mind, that is true for dogs as well.

A promise of a little morsel of food every now and then is not too much to ask to get our dogs – the puppies we’ve kidnapped from their own culture – to want to do the weird stuff that’s prized in our culture. Right?

So, nope. There’s never a day when we stop rewarding. As time goes on, you’ll find that it becomes second nature to incorporate powerful real-life rewards into your daily routine with your dog; for example, when the nice “sit” earns an open car door and a promise of adventure, rather than a cookie. Those, along with warm praise, may become your primary way of rewarding your dog once he’s learned the basics. But do the food rewards ever come to an end? No.

And honestly, as my dear old dogs have aged and moved onto the heavenly branch of our pack, I’m happy for every sweet moment where I gave them a dried liver cube just for that cute little spin they had learned long ago.

Dog Surrender Fees

Espanola, New Mexico, United States. Rescue dog at animal shelter.
Surrendering a dog is never a happy decision, but there are countless reasons that explain why sometimes people have to do it – and its cost may affect where they end up taking the dog. Photo by Tetra Images/Getty Images

I was recently made aware that the term “where can I surrender my dog for free” is searched online thousands of times every month. That’s incredibly sad! It’s also a reality for people when they find themselves facing life circumstances that make keeping their dog impossible.

And, unfortunately, it’s also difficult to find a shelter or rescue to take in surrendered animals without charging a fee. Most (but not all!) do charge a surrender fee of some kind, ranging from $10 to as much as $250.

If you are reluctantly giving up your dog for financial reasons, these surrender fees may be a very real concern for you. There is a significant expense to care for each animal relinquished to shelters and rescues, and the surrender fee generally doesn’t even begin to cover the cost of caring for your dog during her stay with them. Your primary concern should be the care your dog will receive, so if you can pay the fee charged by a top-quality, caring facility to help support their work, do it for your dog’s sake. If you are unable to pay because you are facing financial hardship, explain this to them. Some will waive the surrender fee. Ethically, they should.

Some government-funded and -operated municipal shelters don’t charge a surrender fee, but while there are many very well-run government shelters around the country, sadly a lot are at the bottom of the shelter barrel due to lack of funds and community support. If you are thinking of going the no-surrender-fee municipal route, be sure to check out the facility very carefully to make sure you’re comfortable leaving your dog there.

Researching a place to surrender your dog

If you are considering this, the first thing you must do is make a list of possible options and research those organizations very carefully. If they claim to be a 501(c)3 non-profit organization, look them up on GuideStar – an organization that provides detailed information about non-profits. (Note that municipally owned and managed shelters will not appear on GuideStar.)

Talk to them and ask questions about their procedures and philosophies. They may also ask you questions about your dog and make suggestions or offer resources to try to help you keep her in your home. If you are able to take advantage of those resources, by all means do so!

Do not rely on online reviews. There are countless fronts for rescue-hoarders that can talk a good story, have a lovely website, and actually have passionate supporters but keep animals in horrendous conditions. Are they “no-kill at any cost,” keeping dogs in kennels for as long as a decade or more? (I would give my dog a gentle death in my loving arms before I would sentence her to a lifetime in a stressful prison.)

Visit each organization remaining on your list after you weed out the bad actors. Make sure facilities are clean and the dogs appear well cared for. If they keep their dogs in foster homes, ask if you can visit one or more of those, again to see how the dogs are kept and cared for. Ask if/how they assess the dogs that they take in, and what kind of screening they do of potential adopters. If you can’t visit the sheltering site, and they don’t assess or screen, cross them off your list of places to consider. Tragically, it’s become more and more common for “rescue” operations to descend over time into hoarding cases that make headlines.

Rehoming

Ideally, your dog is friendly and you have a friend or family member who knows and loves your dog with all her faults and foibles and has offered to give her a lifelong loving home. If your dog is prone to displaying problematic behavior, however, rehoming is often not a realistic option. If, for example, your dog has significant behavioral issues that present a real threat to the safety of others or will have a strong negative impact on the quality of life of anyone she lives with, it may not be ethical or realistic to rehome – and it’s possible you could still be liable if she goes off and mauls someone, even after rehoming.

Perhaps it’s not a safety issue – say your own health precludes you from caring properly for your dog, or you are truly in an economic and/or housing bind and can’t give her what she needs. Absent a workable friend or family member, rehoming to strangers is very risky. Once you hand your dog off, you lose all control over what happens to her – and there are a lot of very bad people out there who might do a lot of very bad things to your dog.

Surrender fees help support a helpful resource

Today’s shelters may impose fees, but there is more empathy in the animal protection and dog training industries for people who find themselves in difficult straits and sadly acknowledge that the best choice for themselves and their dog is to surrender their beloved four-legged friend to someone who is better able to care for her. If that is you, we wish you the best, and our hearts are with you as you make these difficult decisions.

Dry Dog Food Labels: How to Compare Fat, Protein, and Carbs

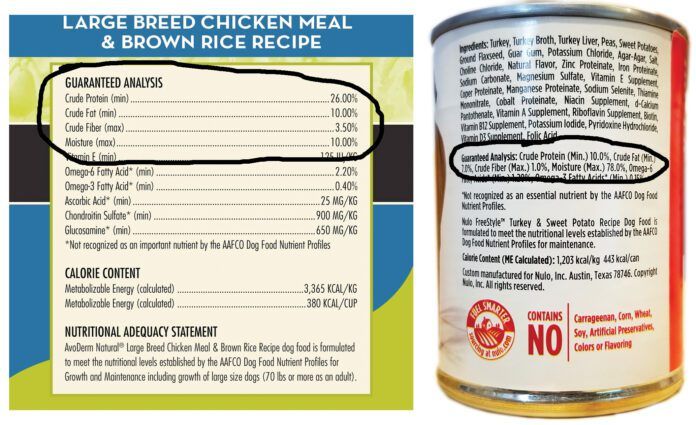
Photo of a canned dog food label with the protein and carbohydrates circled.
Have you ever wondered how canned foods, with seemingly so little protein and fat, are just as “complete and balanced” as dry foods, which seem to contain so much more protein and fat? And have you ever wondered about the carbohydrate content of your dog’s food? After all, dogs are carnivores (albeit ones with an adaptive metabolism). Wonder no longer; here’s how you can learn the answers.

Federal and state laws require pet food makers to put information about the protein and fat content of their products on pet food labels. Unfortunately, few people understand this critical information, making their purchasing decisions based on some of the most insignificant words or pictures on the label. Here’s what you need to know to understand what’s in the bag or can – and to compare one food to another.

Minimums, maximums, and actual amounts

Every pet food label is required to display a “guaranteed analysis” that includes the minimum percentages of crude protein and crude fat and the maximum percentages of crude fiber and moisture that are present in that food “as fed” – as they are in the food’s present form.

Protein and fat are the most important (and costly) nutrients in a dog’s food, so these are reported as guaranteed minimums; this ensures that dogs receive the minimum amounts necessary for health.

Moisture (water) and fiber, being empty of nutrients, are listed by their maximum amounts; this ensures that consumers know the maximum amount of the food’s contents that is without nutrients.

All these amounts are subject to surveillance, testing, and enforcement by feed control officials in every state where the product is sold.

It’s important to understand that the minimum and maximum amounts listed in the guaranteed analyses are just that: minimums and maximums. The actual amount of those nutrients may be significantly different. For example, the minimum fat guarantee on a label may be 8%, but the product might contain 15% fat or more. Similarly, a product with a maximum guarantee of 5% fiber may actually contain only 1%.

Some product manufacturers report more accurate numbers for their products’ nutrients in what’s usually called a “typical nutrient analysis.” These analyses may reflect nutrient levels that have been calculated by a computer analysis of the product’s ingredients and formula, or levels that have been determined by laboratory tests of the product. The most transparent, consumer-friendly pet food makers publish typical nutrient analyses for all of their products on their websites. Other companies make these available by request – and some companies don’t make them available at all!

If it’s critical to your dog’s health that you feed a very specific amount of protein (for a dog with diminished kidney function, for example), fat (say, for a dog who is prone to pancreatitis), or fiber (for a dog prone to constipation or diarrhea), we’d recommend considering only those foods with a readily available typical nutrient analysis.

Further, for the most precise comparison to other products and products of different types (canned, dry, etc.), it’s ideal if these analyses list their nutrient contents in two ways: “as-fed” (meaning, the food as it is presented in its package) and as “dry matter” (the nutrient levels in the food if all of the water were removed).

Why the “dry matter” values matter

Have you ever wondered about the disparity between the amounts of protein or fat listed on the canned (or fresh frozen) food you give your dog, and those on the bag of dry or freeze-dried food he eats? A good-quality dry food may have a minimum of 28% protein listed, while a comparable canned food may be labeled as having just 7% protein. How can a dog live on the (seemingly) paltry amounts of nutrients in canned and fresh foods?

Answer: A dog can subsist on those amounts because they are anything but paltry! In fact, high quality canned and fresh/frozen foods usually contain more fat and protein than high-quality dry foods – if you go by the dry matter values.

In order to directly compare the protein or fat content of one type of food (i.e., canned, dry, raw frozen, or freeze-dried) to another type, you need to consider them on a level playing field. Each of these types of food contains highly disparate amounts of moisture, which affects the “as fed” percentages. The nutrient levels in high-moisture foods are, in effect, diluted.

To compare the nutrient levels in products with disparate amounts of moisture, you have to remove all the moisture from each product. This is easy to do mathematically.

The first step in comparing any two products of different types is to convert the as-fed amounts on the label to dry matter (DM) values. Do this by subtracting the amount of moisture on the label from 100. The result is the food’s dry matter or DM factor.

100 − moisture % = dry matter or DM factor

Then you can divide any listed nutrient percentage by the DM factor to determine its dry matter percentage. For example:

Protein % ÷ DM factor = DM protein

Multiply by 100 to show it as a percentage

Example Label #1 (dry dog food)

Protein (min) 28%

Moisture (max) 9%

100 − Moisture % = DM factor

100 – 9 = 91

The DM factor for this food is 91

To determine the percentage of dry matter protein in this food, take the listed protein percentage (in this case, 28) and divide it by the food’s DM factor (91):

28 ÷ 91 = 0.31

This food is 31% protein by DM

Let’s look at a canned food. The math looks a little different, because the moisture content is so high in canned foods, which makes the dry matter factor number small. The high amount of moisture also makes the as-fed nutrient amounts small (they are literally diluted!). But you use the same formula – and you may be surprised by the result. Check it out:

Example Label #2 (canned dog food)

Protein (min) 7%

Moisture (max) 78%

100 – 78 = 22

The DM factor for this food is 22

To determine the percentage of dry matter protein in this food, take the listed protein percentage (in this case, 7) and divide it by the food’s DM factor (22).

7 ÷ 22 = 0.31

This food is 31% protein by DM

Did that surprise you? Notice that both the dry food in Example Label #1 and the canned food in Example Label #2 contain the same amount of dry matter protein (31%), even though the “as fed” numbers on their labels look very different. If you were trying to find a dry and a canned food that contained a moderate and consistent amount of protein for your dog, you’d do well to run these calculations, to make sure that both types of food offer an appropriate (and similar, if not matching) amount of protein.

What about carbohydrates?

Carbohydrates are not usually listed on a guaranteed analysis, but, if you’ve gotten this far, they are easy to compute. But in order to do so, we have to add one more “nutrient” to the calculation.

The “ash” content of dog food is rarely discussed, even though some pet food manufacturers list the maximum amount of ash in their products on the guaranteed analysis. This is not required, but it’s helpful for dog owners who know what ash is.

Ash is essentially what would be left over if you were to put the food in an oven and burn away everything that could burn; what’s left are all the minerals in the food. Calcium and phosphorus constitute the vast majority of these minerals (interestingly, you could use the ash total as a rough estimate of how much calcium and phosphorus are in the diet), but even the iron, copper, zinc, magnesium, selenium, and the rest of the trace minerals in the food contribute to the total amount of ash.

Though all dog foods need to contain some ash – as they all need to contain the minerals required by dogs – low-quality foods often contain fairly high levels of ash, as much as 10% or more. High levels of ash can impede a dog’s ability to absorb other nutrients – which is why you will almost never see the amount of ash reported by the makers of cheap, low-quality foods, but you may see low amounts of ash voluntarily included in the guaranteed analysis by makers of high-quality foods.

Back to carbohydrates: In order to calculate what percentage of a food is carbohydrates, add the as-fed (label) percentages for protein, fat, fiber, moisture, and ash, subtract their total from 100, and divide the result by the DM factor.

If you can’t find the ash content for a particular food, you can use an estimate of between 5% and 9% as the ash percentage of a canned or dry food. You can use an estimate of between 1% and 4% for the ash percentage of most fresh or frozen raw foods.

Let’s look at another example:

Example Label #3

Protein (min) 28%

Fat (min) 18%

Fiber (max) 3%

Moisture (max) 9%

Ash (max) 9%

To find the carbs in this food, add the label percentages for protein, fat, fiber, moisture, and ash:

28 + 18 + 3 + 9 + 9 = 67

Subtract this total from 100:

100 – 67 = 33

Divide this result by the dry matter factor (for this food, the DM factor is 91):

33 ÷ 91 = 0.36

This food is 36% carbohydrates by DM

Don’t be intimidated!

These calculations are not difficult, just a bit tedious. If you follow along through a few more, you’ll begin to see how easy it is – and how much more you can learn about your dog’s food by doing some math.

Example Label #4 (raw frozen food)

Crude protein 12% min
Crude fat 11% min
Crude fiber 1% max
Moisture 72% max
Ash 3% max

Find the dry matter factor by subtracting the moisture % from 100:

100 – 72% moisture = 28 DM factor
Find the dry matter protein percentage by dividing the label’s protein (12%) by the DM factor (28):

12 ÷ 28 = 0.43

This food is 43% protein by DM

To calculate its carbohydrate percentage, add protein + fat + fiber + moisture + ash:
12 + 11 + 1 + 72 + 3 = 99
Subtract that result from 100:

100 – 99 = 1

Divide that answer by the DM factor (28):

1 ÷ 28 = 0.035

This food is 3.5% carbohydrates by DM

This is a very low-carb food, typical of many raw-food diets. (Remember, dogs don’t have a nutritional requirement for carbohydrates; they can live on fat and protein alone. Dietary fiber offers some functional benefits – read “Dietary Fiber for Dogs” – but many dogs thrive on low- or no-carb diets.)

Ok, just one more. For fun, let’s look at a food that’s on the other end of the carb-content scale. This one is a brand every dog owner knows:

Example Label #5

Crude protein 21% min

Crude fat 10% min

Crude fiber 5% max

Moisture 12% max

Ash (not listed, so estimate) 6%

Find the dry matter factor by subtracting the moisture % from 100:

100 – 12% = 88 DM factor

Find the dry matter protein percentage by dividing the label’s protein (21%) by the DM factor (88):

21 ÷ 88 = 0.24

This food is 24% protein by DM

To calculate its carbohydrates, add the label’s protein + fat + fiber + moisture + ash:

21 + 10 + 5 + 12 + 6 = 54

Subtract that result from 100:

100 – 54 = 46

Divide that answer by the DM factor (88):

46 ÷ 88 = 0.52

This food is 52% carbohydrates by DM

The more you know . . .

When I first came across descriptions of how to calculate dry matter percentages, my brain would freeze. But with practice, it has become easy and even fun – especially when I can exclaim over the carb counts for most grocery-store kibbles. Carbohydrate-wise, we might as well just feed our dogs cinnamon buns! I hope you find this important subject as interesting as I do.

Related Articles

SUBSCRIBER ONLY: WDJ’s 2024 Approved Dry Dog Foods: Search Over 1,000 Varieties
What’s the Best Dry Dog Food? 2024’s Top Picks in 8 Categories
How to Find Healthy Dog Food: WDJ’s Dry Dog Food Selection Criteria

What to Give a Dog for an Upset Stomach

Hungry dog food with a red empty bowl. High angle view.
The best thing to give a dog with an upset stomach and vomiting is nothing. Credit: smrm1977 | Getty Images

The simplest, safest, and best remedy for vomiting is one of the hardest: A fast. (Note: This does not apply if your dog is a puppy or diabetic.) Not feeding your dog when he looks at you with those big, beautiful eyes is hard to resist, but giving your dog’s gastrointestinal tract a rest can be all that is needed.

The total fast time should not exceed 24 hours. After about six hours of fasting, you can start adding water because you don’t want to risk dehydration. Just control his intake a bit. Offer small amounts of fresh water off and on over the day or put ice chips in his bowl instead of water.

Watch to be sure your dog is not getting dehydrated. Check his gums for pinkness and moisture. Also pick up skin near his neck and see if it folds right back down or “tents up.” If he is getting dehydrated, he needs to go to the veterinary clinic for fluids.

You can also offer bouillon to restore some electrolytes. Depending upon your veterinarian’s recommendation for your dog, you may begin feeding small amounts of bland food like chicken and plain white rice at the eight- to 12-hour mark. After 24 hours with no vomit, start back with increased amounts of the chicken and rice and slowly work in his regular diet.

Check the Vomit

It’s important to look carefully at the dog’s vomit before you clean it up (yeah, it’s gross, but you must). Just reaching for a home remedy for vomiting or diarrhea may not be wise in some case. Call your veterinarian, if:

  • There is blood – either bright red or a black coffee-grounds type appearance
  • You see pieces of a mushroom or any medications (as in your beloved puppy chewed into a medicine bottle)
  • The vomiting is accompanied by diarrhea
  • The dog may have eaten something he shouldn’t have, like a sock, a rock, or heaven knows anything else he might have found

OTC Vomiting Remedies for Dogs

For most vomiting cases, you usually can try a home remedy for 24 hours or so to combat an upset stomach with nausea and/or vomiting to see if it helps. If you’re concerned about anything, contact your veterinarian immediately. (You can also try the suggestions below for most diarrhea that is not bloody.)

Pepto Bismol (bismuth subsalicylate) can be used with dogs to safely reduce signs of nausea, heartburn, gurgling, uncomfortable stomach, and diarrhea. A generally accepted safe dose of regular-strength Pepto Bismol (or a generic) for dogs is 0.25 to 2 ml per kg of the dog’s body weight (0.1 to 0.9 ml per lb), for a maximum of three to four times a day. Be aware that use of Pepto Bismol may change the color of your dog’s stool to a gray or greenish-black.

Some dogs will drink Pedialyte, but it may not be the best choice. Because of Pedialyte’s high salt content, you should use caution giving Pedialyte to dogs with heart or kidney diseases, as sodium restriction is often part of managing these conditions. In addition, the level of sugar in Pedialyte is not appropriate for dogs.

Can dogs eat ginger? Yes. Just as your mother probably gave you ginger ale to drink when you were battling a stomachache, ginger can help dogs too (but not the soda!). You can make ginger or chamomile tea. Your dog may prefer a touch of honey added to entice him to drink. Do not give him straight ginger root to chew on.


My Dog Ate a Frog (or Was It a Toad?)

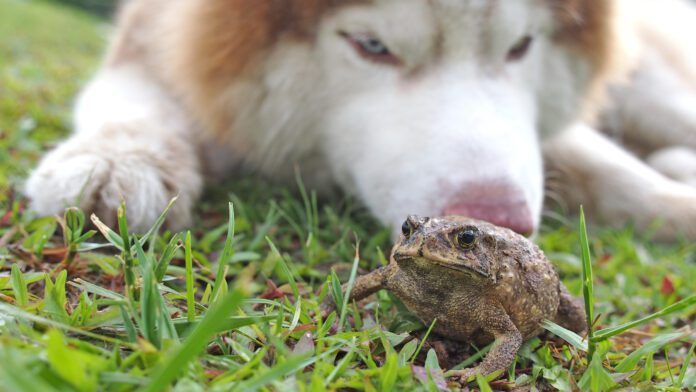
Toad Swell on The Lawn After Meeting Siberian Husky
This toad is not happy the dog is nosing him, and he’s swelling up to make himself look bigger. Plus, just the dog nosing the toad can be dangerous to the dog. Credit: Wichatsurin | Getty Images

Chasing a frog or a toad can be exciting if you’re a dog. But what if your dog bites it? Licks it? Or, worse, eats it? Well, you better know a toad from a frog because it makes a big difference in your dog’s health.

“The difference between ingesting a frog and a toad can be quite massive, as toads can be very poisonous for dogs,” says Dr. Anna Robinson, a small animal veterinarian in New Braunfels, Texas.

“Frogs in North America mostly cause mild to moderate gastrointestinal issues with your dog. You’ll typically see some vomiting and diarrhea that’ll correct itself over the span of a few days many times without veterinary intervention required. For frogs, you just pretty much wait it out and just comfort your dog while he goes through the symptoms,” she says. “Just make sure he doesn’t become dehydrated. If so, then you need to call your veterinarian.”

If you can’t reach your veterinarian or an emergency animal clinic, call the ASPCA Animal Poison Control Center at 888-426-4435 or the Pet Poison Helpline at 855-764-7661. There will be a charge for their services, but it’s well worth the cost. If you call, be sure to also get your case number to follow-up with your veterinarian.

Toads Secrete Poison

Certain species of toads can secrete a toxin that can poison animals who attempt to ingest them. Whether a dog licks or completely ingests a toad, he can suffer from excessive drooling, vomiting and/or irritation in the mouth or worse.

More severe poisonings can happen with the cane toad and the Colorado River/Sonoran Desert toads. The cane toad is typically found in Florida, Hawaii, Louisiana, Texas, and other tropical areas. The Colorado River/Sonoran Desert toad can be found in Arizona, California, New Mexico, and Texas. Both toads can cause life-threatening poisoning.

Signs of Poisoning

Symptoms you may see:

  • Pawing at the mouth or vocalizing
  • Gums may become very red and irritated
  • Vomiting and diarrhea
  • Stumbling (progressive)
  • Tremors/seizures (progressive)
  • Abnormal eye movement (progressive)
  • Difficulty breathing (progressive)
  • Decreased heart rate and abnormal heart rhythms (progressive)

Whether it was a frog or a toad, immediately flush the mouth with large amounts of running water using a hose or garden sink sprayer. Doing so will decrease the amount of poison absorbed, which decreases the severity of the clinical signs. However, make sure you point the water out of the dog’s mouth, as you do not want him to swallow or inhale the water. And then get to the veterinarian’s office ASAP.

At the Vet’s Office

The veterinarian will prescribe treatment depending on the signs that develop as well as the type of toad and amount of ingestion. Treatment might include:

  • Intravenous fluids
  • Anti-nausea medication
  • Muscle relaxants
  • Medications to control the heart rate or seizures
  • Possible surgery to remove ingested toads

“It can be difficult for an owner to be able to distinguish between a frog and a toad, but it’s important to know your amphibians,” says Dr. Robinson. “It could save your dog’s life.”

Dog Tear Stain Remover: When and What to Use

Cute Maltese puppy dog close up head-shot of the eye detail with typical tear staining around the eye.
Rusty tear stains on a pretty white dog can reduce any dog lover to tears. Start by ruling out any veterinary problems. Credit: Environmantic | Getty Images

If the beauty of your dog’s face is marred by rusty red streaks caused by dog tear stains, schedule a veterinary examination before using a dog tear stain remover. Many eye diseases and conditions can cause dog tears and resolving the underlying issue is better for your dog’s health and comfort.

If your dog suffers from red eyes, eye discharge or any of the following conditions, getting treatment for them may resolve your tear-staining issue:


  • Conjunctivitis
  • Corneal ulcer or injury
  • Foreign bodies
  • Glaucoma (elevated intraocular pressure)
  • Distichiasis (extra eyelashes that rub on the cornea)
  • Entropion (rolled eyelids causing haired skin to rub the cornea)
  • Tear duct obstruction

Why Is My Dog Crying?

While widely believed not possible in the same sense as human tears, a 2022 study published in Current Biology may have changed that thinking. The researchers found that a dog’s tear volume increased when the dog felt positive emotions, such as during a reunion with their owner. The researchers believe “emotion-elicited tears can facilitate human-dog emotional connections.”

Tear Stain Prevention

If your veterinarian confirms your dog’s eyes are healthy, here are some simple things you can try to prevent and/or remove tear stains before trying a dog tear stain remover:

  • Keep long hairs on the face or near the eyes trimmed back. Long hairs rubbing on the eyes are very irritating. Long hairs around the eyes also wick tears down the face, worsening tear staining.
  • Cleanse your dog’s periocular (around the eyes) area at least once a day. Use a moistened cotton ball or cloth. Eye wash solutions containing boric acid can be safely used. Never use hydrogen peroxide near your dog’s eyes.
  • Rub a small amount of petroleum jelly onto the hairs near the inside corner of the eyes after cleansing. This helps keep the tear pigment from penetrating the hairs, which helps minimize staining.

Food Allergies and Tear Stains

Because food allergies can cause excessive tearing, you can try changing your dog’s diet. There are many hypoallergenic or limited ingredient diets out there to try. Probiotics, which are good for your dog’s gastrointestinal tract and general health anyway, have been purported to help minimize tear staining, so they are well worth a try.

Best Dog Tear-Stain Remover

The most popular and widely known commercially available dog tear stain remover for eliminating and preventing tear staining is Angel Eyes, currently manufactured by H & C Animal Health. Years ago, this product gained popularity because it really did work! The active ingredient was antibiotic, initially tetracycline followed by tylosin.

The FDA eventually cracked down on the use of these antibiotics for tear staining in dogs. Without tetracycline or tylosin, the product is less effective. The more recent addition of cranberry extract, which has bioflavonoids that alter bacteria’s ability to stick to body tissues, may help. It should help with any odor associated with tear staining.

Tear-Stain Home Remedies

There are many anecdotal reports of this or that helping with tear staining, such as adding buttermilk flour, parsley flakes, or apple cider vinegar to your dog’s food.

Before trying anything, including commercially available dog tear stain removers, always talk to your veterinarian. And remember, provided any underlying medical conditions have been ruled out, tear stains, while unattractive, are not harmful to your dog.

Latest Blog

Informing? Or Selling?

A couple of days ago, I received a text from a dog-training client, wondering about a video she had just watched—and which she linked in the text. “Is meat meal bad for dogs?” she asked. She followed that message with, “I get that she’s selling her own pet food, but is it (meat meal) that bad?”